Installation Instructions
Pre-requisites
If you intend to perform any kind of experiment automation, please read this section carefully. However, to load and visualize data, or to run a virtual experiment, the following is not needed.
Hardware
In order to enjoy lightlab’s experiment control capabilities, we assume that you have VISA compatible hardware: at least one computer with a GPIB card or USB-GPIB converter; one instrument; and your favorite VISA driver installed. Just kidding, there is a one-company monopoly on that (see below).
pyvisa
We rely heavily on pyvisa for instrument control. It provides a wrapper layer for a VISA backend that you have to install in your computer prior to using lightlab. This is typically going to be a National Instruments backend, but the pyvisa team is working on a new pure-python backend (pyvisa-py). Refer to pyvisa_installation for installation instructions. If you need to install in ubuntu, see Installing NI-visa (32-bit) on Ubuntu (64-bit).
Warning
Currently we are also working with python3. This might present some minor inconvenience in installation, but it allows us to write code that will be supported in the long term. All dependencies are easily available in python3 and are automatically installed with pip.
Proceed with installing lightlab once you have something that looks like the following output:
>>> import visa
>>> rm = visa.ResourceManager()
>>> print(rm.list_resources())
('GPIB0::20::INSTR', 'GPIB1::24::INSTR', 'ASRL1::INSTR', 'ASRL2::INSTR', 'ASRL3::INSTR', 'ASRL4::INSTR')
Installation in personal computer
Regular users can install lightlab with pip:
$ pip install lightlab
For more experienced users: install the lightlab package like any other python package, after having downloaded the project from github.:
$ python3 install setup.py
If you are new to python programming, jupyter notebooks, you might want to sit down and patiently read the Getting Started to Python, Jupyter, git Pages.
Server Installation Instructions (Advanced)
The state module saves information about instruments, benches, and remote hosts in a file called ~/.lightlab/labstate.json. Normally you wouldn’t have to change the location of this file. But if you so desired to, it suffices to use the shell utility lightlab:
$ lightlab config set labstate.filepath '~/.lightlab/newlocation.json'
$ lightlab config get labstate.filepath
labstate.filepath: ~/.lightlab/newlocation.json
It is also possible to set a system default for all users with the --system flag:
$ sudo lightlab config --system set labstate.filepath /usr/local/etc/lightlab/labstate.json
Password:
----saving /usr/local/etc/lightlab.conf----
[labstate]
filepath = /usr/local/etc/lightlab/labstate.json
But all users must have write access to that file in order to make their own alterations. A backup is generated every time a new version of labstate is saved in the following format labstate_{timestamp}.json.
Centrallized server (Tutorial)
The instructions below allow you to control multiple instruments connected to a network of hosts from a single location.
The basic setup is that there is one central lab computer that is the “instrumentation server.” Other computers connect to the instruments through GPIB/USB/etc. These are “hosts.” All of the hosts need National Instruments (NI) Measurement and Automation eXplorer (MAX). Start a NI Visa Server in each host, and naturally connect from the server via pyvisa.
Host machines
You first need to install NI-VISA in all machines, including the server, which can also play the dual role of a host, since it can also be connected to instruments. Download NI-VISA here. Installing for MacOS, Windows, Linux (Fedora-like) was a matter of following NI’s instructions. Installing in ubuntu machines was a little trickier, but here is what worked for us.
Installing NI-visa on Windows
Todo
Include instructions.
Installing NI-visa on Windows
Warning
Currently not supported.
Installing NI-visa (32-bit) on Ubuntu (64-bit)
Followed instructions found here, but in computers with EFI secure boot, like all modern ones, we need to sign the kernel modules for and add the certificate to the EFI. For this, follow these instructions.
Sign all modules in /lib/modules/newest_kernel/kernel/natinst/*/*/.ko
Run the following after sudo updateNIdrivers (reboot required!):
kofiles=$(find /lib/modules/$(uname -r)/kernel/natinst | grep .ko)
for kofile in $kofiles; do
    sudo /usr/src/linux-headers-$(uname -r)/scripts/sign-file sha256 /home/tlima/MOK.priv /home/tlima/MOK.der $kofile
done
Then start nipalk:
sudo modprobe nipalk
sudo /etc/init.d/nipal start
Test with:
visaconf  # for configuring, for example, GPIB interfaces
NIvisaic  # for testing instrument control
Opening NI-visa servers on all hosts
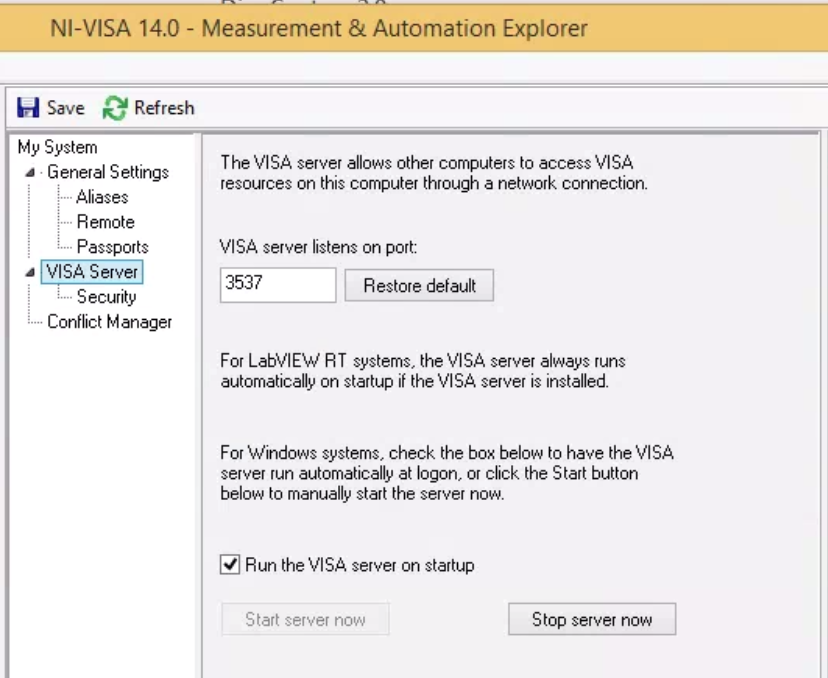
Open NI-MAX. In the main menu bar: Tools > NI-VISA > VISA options. This will open a panel.
In My System > VISA Server, check “Run the VISA server on startup.” Click “Run Server Now.”
In My System > VISA Server > Security, click the Add button, and put in a “*” under Remote Addresses. This white flags all other computers.
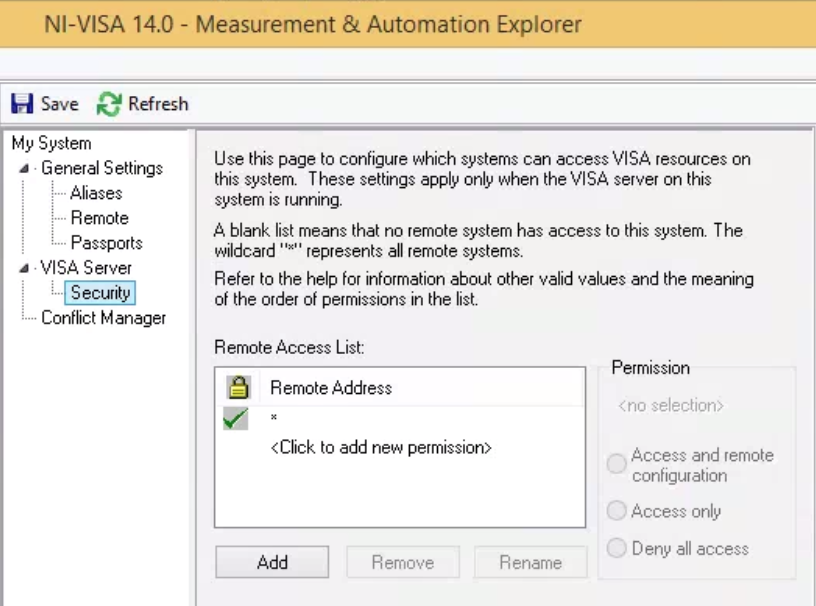
Click Save at the top left.
Troubleshooting
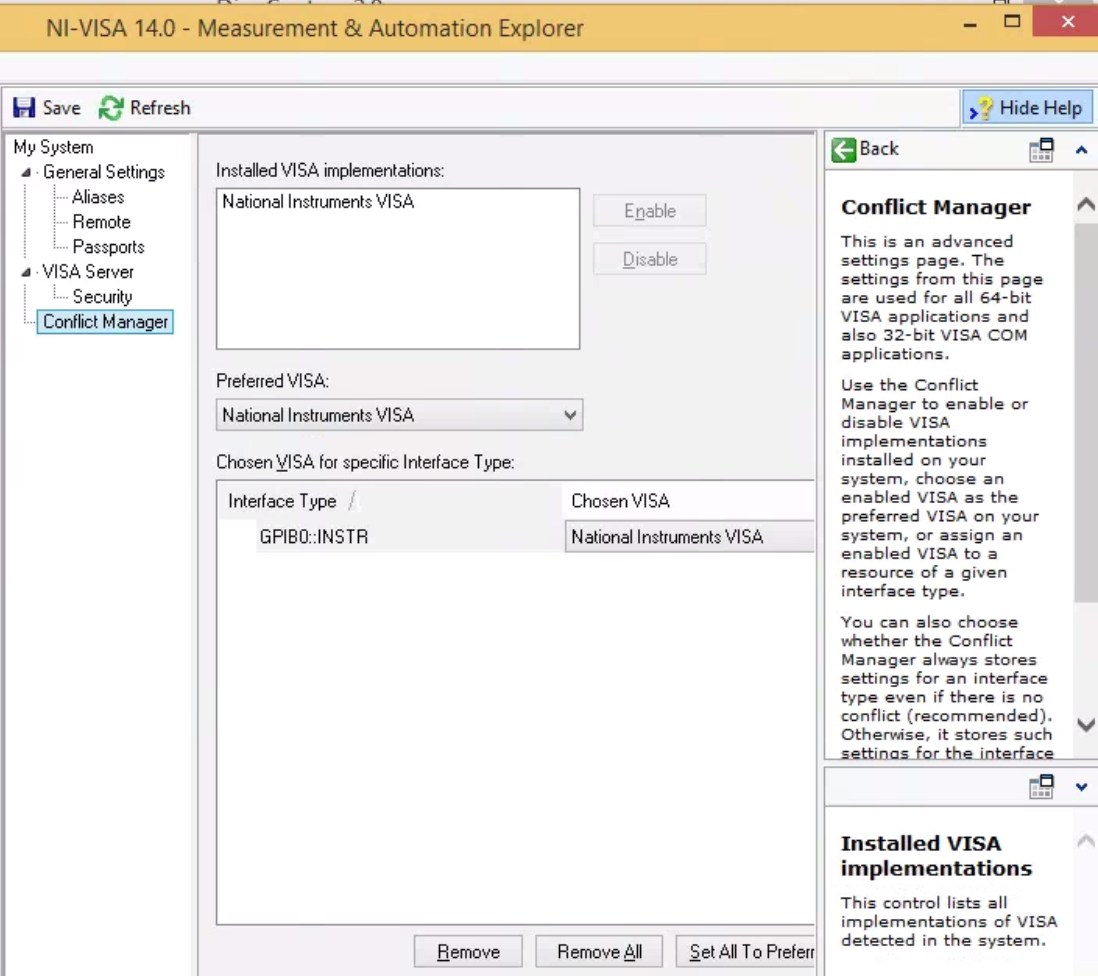
If you have been using Tektronix drivers, there might be a conflict with which VISA implementation will get used. These can be managed in the Conflict Manager tab.
General settings > Passports: Tulip sometimes gives trouble. The box should be checked, at least on 32-bit systems. Bugs were un-reproducible for us.
Instrumentation server machine
The below assumes that this system is Linux.
User configuration
There are several types of users.
- sysadmin (you)
- super-users a.k.a. root (you, possibly other lab members who know UNIX)
lightlabdeveloperslightlabusers- those with lab access, meaning they are allowed to configure and access hardware (you, most grad students)
- those without lab access, meaning they can still see data and write data analysis code (most undergrads)
In the below examples, we will use the following usernames
- arthur: you, sysadmin
- lancelot: a grad student and
lightlabdeveloper- bedivere: a grad student user
- galahad: an undergrad who is anayzing bedivere’s data
Set up a user on this computer corresponding to every user who will be using the lab. Make sure port 22 is open for ssh access. Give them all a tutorial on ssh, python, and ipython. Give yourself and lancelot a tutorial on git, SSHFS, pip, and jupyter.
Install basic tools globally
lightlab requires python 3.6. You also will need to use virtual environments to execute compiled code, install and freeze dependencies, and launch IPython servers. The first time, install these on your system environment:
$ sudo apt-get update
$ sudo apt-get install python3.6

$ sudo apt-get install python-pip python-dev build-essential
$ sudo pip install --upgrade pip
$ sudo pip install --upgrade virtualenv
For different versions of Ubuntu/Linux, you are on your own. See here and there.
Initializing labstate, setting lab accessors
Make a jupyter “user”:
sudo useradd -m jupyter
sudo passwd jupyter
<enter a new password twice>
Make a jupyter group specifying who is allowed to run jupyter servers and change the labstate:
sudo groupadd jupyter
sudo usermod -a -G jupyter arthur
sudo usermod -a -G jupyter lancelot
sudo usermod -a -G jupyter bedivere
# <do not add galahad>
The jupyter user home directory can be accessed by any user and written only by the jupyter users:
cd /home
sudo chown root jupyter
sudo chgrp jupyter jupyter
sudo chmod a+r jupyter
sudo chmod a+x jupyter
sudo chmod g+w jupyter
We want to place labstate.json in /home/jupyter/labstate.json. As documented above, this can be done system-wide with:
# Running from an environment in which lightlab is installed
sudo lightlab config --system set labstate.filepath /home/jupyter/labstate.json
If anybody outside of group jupyter tries to change the labstate, it will not work.
The first time labstate is initialized, you’ll want to add the hosts and benches in the lab. This is documented in Making and changing the lab state.
Handling virtual environments that install lightlab
Install virtualenvwrapper with pip.
To make all users see the same virtualenvwrapper, create a file in /etc/profile.d/virtualenvwrapper.sh and place the following bash script:
# Working with multiple virtualenv's
export WORKON_HOME=/home/jupyter/Envs
source /usr/local/bin/virtualenvwrapper.sh
Note
Make sure that /home/jupyter/Envs belongs to the group jupyter and that permissions are set so that users necessary can have access to it.
Then, follow the instructions (adapted from virtualenvwrapper.sh’s source code):
#  1. Create a directory to hold the virtual environments.
#     (mkdir /home/jupyter/Envs).
#  5. Run: workon
#  6. A list of environments, empty, is printed.
#  7. Run: mkvirtualenv lightlab
#  8. Run: workon
#  9. This time, the "lightlab" environment is included.
# 10. Run: workon lightlab
# 11. The virtual environment lightlab is activated.
Then, every user in the machine can call workon lightlab to activate lightlab’s virtualenvironment.
Running a jupyter server for the regular users
Important
Securing a jupyter notebook server.
Please follow instructions in Securing a notebook server if you and more user plan to connect to the server remotely.
Jupyter notebooks can run arbitrary system commands. Since jupyter does not yet support key authentication, the only protection is strong passwords. There should never be a jupyter server launched by root.
Developers can run their own virtual environments, but there are two reasons to have a centralized one like this. 1) keeps data and notebooks centralized so they can be shared to outsiders and git-tracked easily, 2) serves users who are not developers and who therefore do not need an environment that links dynamically to lightlab.
Create a directory for your lab’s data gathering notebooks and data. Ours is called lightdata:
cd /home/jupyter
mkdir lightdata
chgrp lightdata jupyter
chmod a+r lightdata
chmod a+x lightdata
chmod g+w lightdata
chmod +t lightdata
The last line sets the sticky bit. That means when a file is created within that directory, it can only be modified or deleted by its owner (i.e. the person that created it).
Finally, after having adapted security instructions above, you should have an SSL certificate and port configuration setup in /home/username/.jupyter/jupyter_notebook_config.py, start your jupyter server from within the virtual environment by doing the following:
# logged in as any user in jupyter group
cd /home/jupyter/lightdata
workon lightlab

# in case you have just created this virtual environment
pip install lightlab

# and other packages you find useful. See our full list
# in dev-requirements.txt in our github page.
pip install jupyter pyusb pyserial

# set a password for your notebook. This will be stored
# in /home/username/.jupyter/jupyter_notebook_config.json
jupyter notebook password

# starts the jupyter notebook process and stays alive
# until stopped with Ctrl-C
jupyter notebook
If you have developers, set up CI for your own fork (optional)
If you are constantly helping with the development of lightlab, it is possible to utilize CI (continuous integration) to automate reinstallation of the package. In our case, we use Gitlab CI/CD in a different machine to trigger the deploy in the instrumentation server.
User: getting started
These are instructions that you may give to potential users in this setup. We recommend you placing the source code of lightlab inside /home/jupyter/lightdata/lightlab for their convenience. The source code has tutorial notebooks in lightlab/notebooks. We also recommend placing this documentation in docs, which can be modified by you, to make it easier. Jupyter servers can render .md files and can also serve html pages such as this one.
Connecting to the instrumentation server
First, make sure that your have a user account set up on the your server. Let’s say your domain is “school.edu” First, do a manual log on to change your password to a good password. From your local machine:
$ ssh -p 22 <remote username>@<server hostname>.school.edu
<Enter old password>
$ passwd
<Enter old, default password, then the new one>
Make an RSA key
On your local machine:
ssh-keygen -t rsa -C "your.email@school.edu" -b 4096
You do not have to make a password on your ssh key twice, so press enter twice. Then copy that key to the server with:
$ ssh-copy-id <remote username>@<server hostname>.school.edu
<Enter new password>
Faster logging on
In your local machine, add the following lines to the file ~/.ssh/config:
Host <short name>
     HostName <server name>.school.edu
     User <remote username>
     Port 22
     IdentityFile ~/.ssh/id_rsa
You can now ssh <short name>, but it is recommended that you use MOSH to connect to the server:
$ mosh <short name>
MOSH is great for spotty connections, or if you want to close your computer and reopen the ssh session automatically.
Using jupyter notebooks
Jupyter notebooks are interactive python sessions that run in a web browser. If you are just a user, your sysadmin will set up a notebook server and give you a URL and password. Some examples can be found in the lightlab/notebooks/Tests directory.